SFTP on Windows: Using WinSCP
Your Webspace and How to Install WinSCP
At Georgia Tech, your prism account comes with an allotment of disk space on acme. To successfully complete this lab, you will have to store files on this remote system. To get your files from your home computer to your GT account, you will need an SSH file transfer protocol (SFTP). As we said before, an SFTP allows you to securely copy files from a local computer to a remote computer and vice versa. WinSCP is one such protocol, and the one we recommend you use. If you wish to explore other options in your free time, you might consider FileZilla.
As an aside, if you are doing this portion of the lab on a computer on a library Windows machine, WinSCP should already be installed.
If you do not already have WinSCP installed on your computer, you'll need to download it from
https://software.oit.gatech.edu/request.php?platform=winxp. Once downloaded, double click the setup file to begin the installation.
A note about installation: We recommend and will be assuming you installed with the Norton Commander interface, though you're welcome to use whichever
you like.
Once installed, start WinSCP by double clicking the newly created shortcut for WinSCP on your desktop or selecting it from your Programs menu.
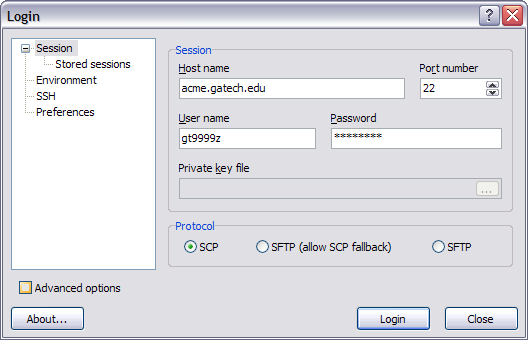
If you do not have any stored sessions, you will be started in the Session configuration screen. Enter the following:
Host Name: acme.gatech.edu
User name: Your TSquare Username/Prism Id
Password: Your TSquare/ Prism Password
Port number: 22
Protocol: SCP
The result should resemble this:

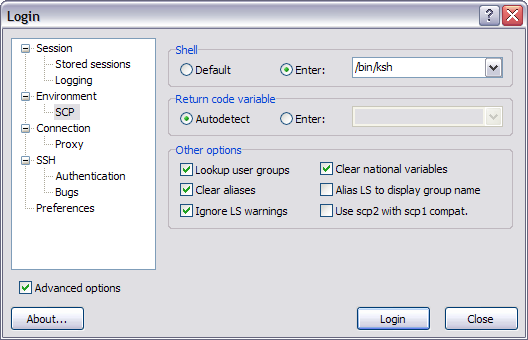
Now click the Advanced options checkbox, and then click on the SCP section under Environment.
Under Shell, click Enter: then choose or type /bin/ksh in the drop-down box. So, you should now have something like:

Now, go to the Stored sessions section and click Save... to avoid having to re-enter the configuration. Finally, click Login.
You will be prompted to add acme.gatech.edu's host key to the Registry. Click Yes if you do not want to see this warning again.
Setting Permissions
First, before you begin uploading any files, you will need to go to Preferences, and set your Permissions
settings as seen below:
Files and folders have three permissions
(See: More Permissions)
for three kinds of people. The three permissions are:
| Abbreviation | Name | Description |
|---|---|---|
| R | Read | Allows people to view the file, or files in the folder. |
| W | Write | Allows people to edit the file, or add/remove files to the folder. |
| X | Execute | Allows people to run the file, or the files in the folder |
The three types of people are Owner, Group, and Others. You are Owner, everyone else will be Group or Others,
so we'll treat them the same.
Lastly in terms of permissions, you will need to go up to the folder above the one with your name on it and give it
the same permissions by right clicking and setting its properties.
Transferring Files
Now, in the directory with the same name as your Prism ID (should be the one you start in), you will need to create a folder named public_html. This is where Acme thinks to look for your files. Everything you are submitting for this assignment must be in your public_html folder.
Once the public_html directory has been created, navigate the left section of the window (your local files) to wherever you created the files for your assignment. On the right, navigate inside your public_html folder. Finally, select all of the files that you wish to submit on the left and drag them into the folder on the right. If you wish to update your website before the deadline or after it has been graded, simply redrag the updated files from the left to the right.

